Sharing articles has never been easier with our article directory WordPress plugin. Learn how to get started with it in just three steps!

If you want to share articles with your audience, picking the right software is essential. However, choosing an article directory WordPress plugin isn’t always easy. It can be tough to find one that balances powerful features with easy-to-use settings.
Fortunately, we have you covered with the best WordPress directory plugin, Business Directory Plugin. With the help of this tool, you can build a practical article directory without breaking a sweat.
What is an article directory?
Before getting started, let's talk about article directories.
An article directory is a website with a collection of articles. They are about various topics or a narrowed-down, niche article directory.
These articles are sourced from all over the web. It's an excellent way for publishers to get additional backlinks and traffic. Even for a hobby blogger, an article listing site is a huge help. Submitting articles to directories has HUGE potential to grow their audience.
When you create your own article directory, you need to build a great Domain Authority and SEO. A valuable site offers the most valuable backlinks and traffic. And if you offer a ton of value, it's easy to monetize a directory website.
In this post, we’ll show you how to create an article directory in three steps. We’ll also give you a few tips to help you maximize its benefits.
Let’s go!
Step 1: Customize your article listings
Let's start by setting up your basic directory. First, ensure you've installed and activated the premium version of our plugin. Then, adjust your core settings as necessary.
Afterward, you'll need to create your directory pages. Our plugin will offer to do this for you:
Alternatively, you can create your own by adding a [businessdirectory] shortcode to a page. You can also add a submission page the same way with the [businessdirectory-submit-listing] shortcode.
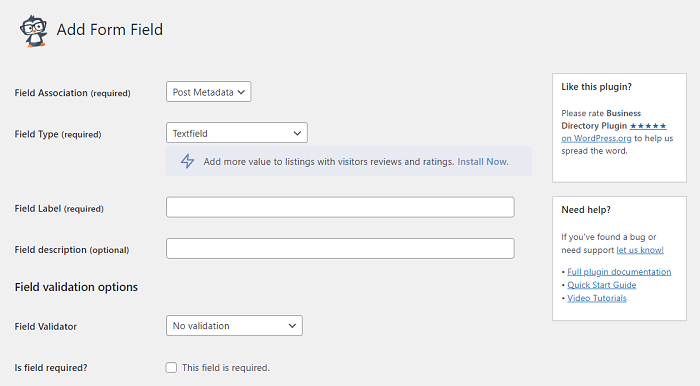
Next, you can edit the default form fields you want to apply to your articles. For example, you might want to add options for users to include their pen names, external links, or brief descriptions. You can do so by going to Directory → Form Fields → Add New Form Field:
If you want to build a niche article directory, using unique form fields can help you get more specific. For example, if you're collecting articles about movie stars, you can add a field that asks which film the author is writing about.
Add the required information and save your changes. To modify the order that these form fields appear, you can go back to the Form Fields to rearrange them.
Step 2: Enable visitors to submit articles
Now, you can make it easier for users to send in their own articles. Start by deciding on the payment options: you can set up plans for paid listings or stick to free submissions.
If you choose paid plans, there are several payment gateways with Business Directory — from PayPal payments to Stripe!
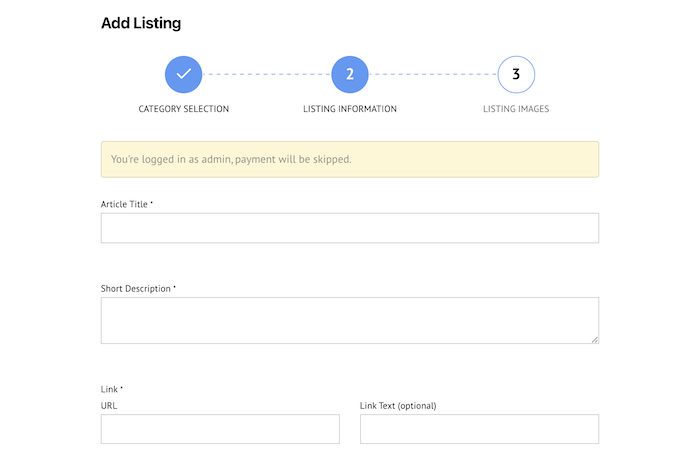
Next, you'll need to set up your front-end submission form. Go back to the listing page you created in step one. After you publish it, you should see a form that looks like this, but includes the fields you chose:

Now visitors can send their articles to be included in the directory. If you want to read these posts before they go live on your site, go to Directory → Settings → Listing and ensure the default listing status is set to Pending.
Step 3: Add a powerful organizational system
At this point, you should have used our article directory WordPress plugin to build a simple site. Nevertheless, you may also want to add a few organizational features to take it to the next level.
For example, we recommend setting up categories. These can make it easier for users to browse your website. You can start by installing the category add-on, then navigating to Directory → Directory Categories:

Fill in the fields on the left-hand side to add your new category. You can also create hierarchies to make finding specific articles easier for your users.
We also recommend that you add a search function, which is an essential directory tool for any website. Simply use our built-in shortcodes to display simple or advanced search fields:

For more information on this tool, you can check out our knowledge base article on search functions.
What next?
Now that you've set up the structure of your article directory in WordPress, all that's left is customizing it.
You can search for article directory themes or other WordPress themes to find something you like. Play around with the options you find as there's tons of categories out there.
Also, don't stop learning! With Business Directory, you can also make:
- WordPress staff directories/employee directory websites
- Business directories (obviously ?)
- Classified Ads
- And more!
So, really, there's a lot you can still do! It's time to get started.
Ready to create your article directory in WordPress?
Sharing articles shouldn't be a struggle.
Fortunately, if you'd rather focus on content than setup, Business Directory Plugin for WordPress has you covered. With the help of our WordPress article directory plugin, you can build a top-tier article directory in no time.
In this article, we showed you how to use our WordPress directory plugin in three steps:
- Customize how you want to display your article listings.
- Enable your users to submit listings with their own content.
- Add organization features like categories and search systems for your directory list.
Business Directory Plugin has all the functions you need to kickstart your new online directory. Check out what our premium plans can help you do today!


 How to Create a WordPress User Directory [An Easy Guide]
 How to Create a Business Directory with Elementor
 The Ultimate Restaurant Directory Website WordPress Plugin
Leave a Reply